Clip-in hair extensions are a quick, easy, and damage-free way to transform your hairstyle without the commitment. Whether you’re looking for longer locks, added volume, or a glamorous updo, clip-ins let you elevate your look in minutes—no salon visit required.
To achieve a flawless, natural finish, it’s essential to apply them properly. In this comprehensive guide, we’ll walk you through everything you need to know to apply clip-in extensions like a pro—from selecting the perfect set to styling and maintaining them so they stay stunning for months..
What Are Clip-In Hair Extensions?
Clip-in hair extensions are versatile wefts of real or synthetic hair, equipped with small, sewn-in clips that easily attach to your natural hair. Designed for a secure and damage-free application, they offer a quick and effortless way to transform your look.
Key Features of Clip-In Extensions:
- Available in sets containing 4 to 10 wefts per pack
- Wefts vary in width, ranging from single-clip pieces to larger four-clip sections
- Built with durable, silicone-backed clips for enhanced comfort and a secure grip grip
Why Choose Clip-In Hair Extensions?
There are many types of extensions—tape-ins, sew-ins, halos—but clip-ins offer unique benefits, especially for beginners or those who love styling freedom.
Temporary
Clip-in extensions are perfect for temporary use. You can put them in for the day or night and easily remove them before bed.
This means no long-term commitment, no damage to your natural hair, and no tension on your scalp. They’re ideal for people who want to switch up their look without the drawbacks of permanent extensions.
Versatile
Clip-ins are incredibly versatile, making them perfect for all kinds of hairstyles. Use them to create stunning updos, half-up styles, sleek ponytails, or simply to add volume and length to your everyday look. They let you experiment with your hairstyle for any occasion, from casual outings to glamorous events.
Affordable
Unlike other types of extensions, clip-ins don’t require costly salon applications. You can easily apply them at home, saving money on professional services.
Plus, with proper care, clip-ins can last up to 12 months, making them a budget-friendly option in the long run.
Beginner-Friendly
Clip-in extensions are the easiest type to use, even if you’re new to hair extensions. They don’t require glue, heat, or braiding skills, so anyone can apply them with confidence.
They’re quick to put in and just as easy to remove, making them perfect for people with busy schedules who still want to look their best.
In short, clip-in hair extensions offer an unbeatable combination of convenience, style, and affordability, making them a must-try for anyone looking to enhance their hair game!
Choosing the Right Clip-In Hair Extensions

Before applying clip-ins, you’ll need to choose the right set for your hair type and style goals.
1. Hair Type: Human vs. Synthetic
- Human Hair Clip-Ins – Can be curled, straightened, dyed, and washed. Look and feel natural.
- Synthetic Hair Clip-Ins – Less expensive, but limited styling and shorter lifespan.
For long-term use and maximum realism, always go for 100% human hair—like the premium clip-ins offered by trusted vendors such as Joice Hair.
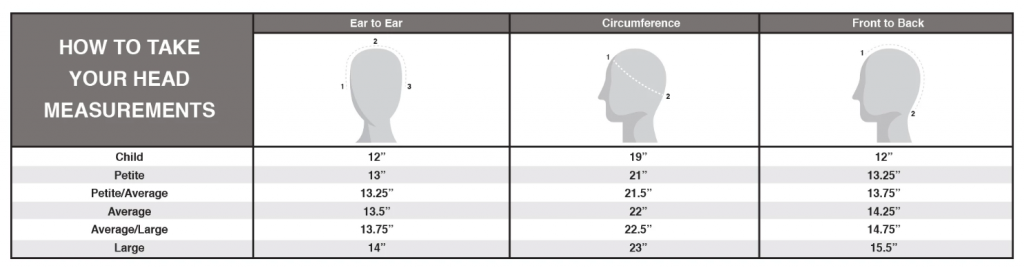
2. Length & Weight
Choose a length close to your natural hair for the most seamless blend. Common lengths:
- 14–16” for natural volume
- 18–22” for added length
- 24”+ for dramatic styles
Weight (measured in grams) affects volume.
- 120–150g for thin hair
- 160–200g for medium
- 220g+ for thick or short hair
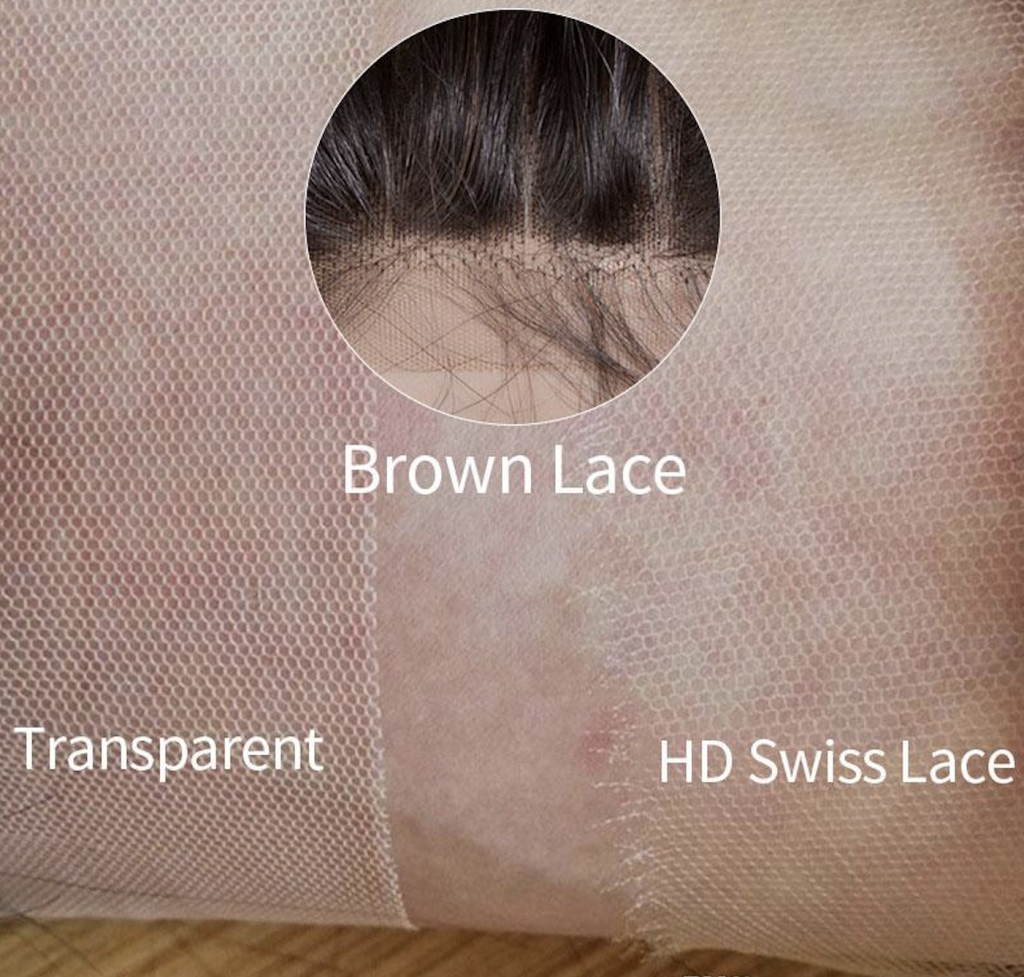
3. Color Match
Perfect blending starts with the perfect color. Match your ends—not your roots—for a seamless transition.
Some brands (like Joice Hair) offer color matching services based on customer photos.
What You’ll Need to Apply Clip-In Extensions
Achieving flawless results with clip-in hair extensions starts with the right tools. Begin with a complete set of clip-in wefts—your foundation for a stunning look. A sectioning comb or rat-tail comb is key for creating clean, precise partings, while hair clips or duckbill clips are essential for holding sections securely during application.
To ensure a seamless blend, use a hairbrush or loop brush to detangle and integrate the extensions naturally. For a polished, professional finish, optional tools like heat styling devices or a texturizing spray can help you achieve your desired style.
With these tools at your disposal, you’ll be ready to create a flawless, salon-quality look with ease.
How to Apply Clip-In Hair Extensions: A Step-by-Step Guide
Applying clip-in hair extensions doesn’t have to be intimidating—even beginners can master it with ease. Follow these simple steps to achieve a flawless, professional look.
Step 1: Prepare Your Natural Hair
Start with clean, dry, and detangled hair for the best results.
- Brush your hair from the ends upward to eliminate knots and tangles.
- If your hair is fine or silky, spritz some texturizing spray at the roots to help the clips stay secure.
You can style your natural hair however you like—straight, curled, or blow-dried—depending on the look you’re going for.
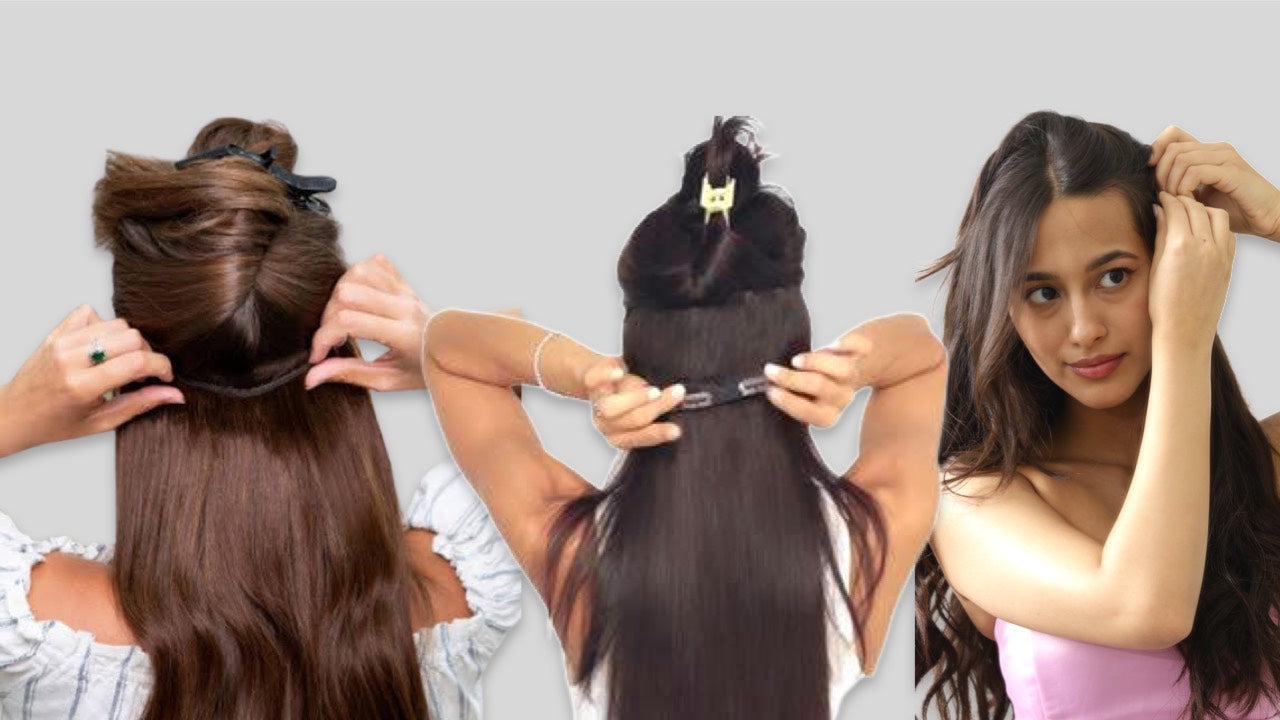
Step 2: Section Your Hair
Using a rat-tail comb, create a horizontal section at the bottom layer of your hair, just above the nape of your neck.
- Clip the rest of your hair up and out of the way.
- Ensure your part is clean and even for a secure base.
This section will hold the widest weft, typically the one with 4 clips.
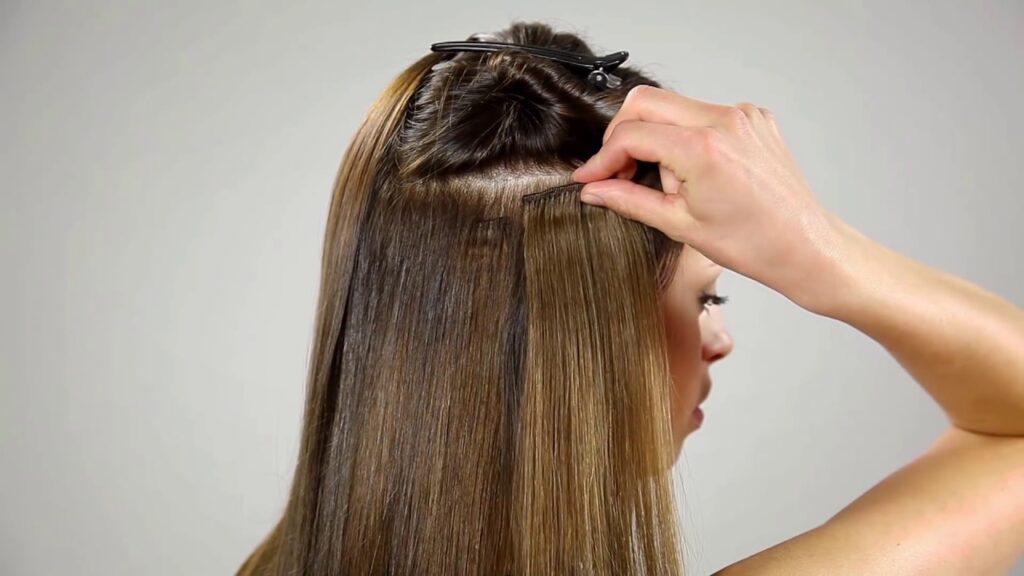
Step 3: Attach the First Weft
Grab the widest weft (3 or 4 clips) and:
- Open all the clips.
- Position the middle clip at the center of your part.
- Snap it securely into place at the roots.
- Attach the outer clips, ensuring the weft lays flat and snug against your scalp.
Step 4: Add Additional Wefts
Continue working upward, sectioning your hair about 1 inch higher each time.
- For mid-level sections, attach 3-clip wefts.
- On the sides of your head (just above the ears), use 2-clip wefts.
- At the front, add single-clip pieces for volume and seamless blending.
Repeat this process until all wefts are in place or until you’ve reached your desired level of fullness and coverage.
Step 5: Blend and Style
Release the top layer of your hair to cover the wefts and gently brush through to blend.
- Use a flat iron or curling wand to merge your natural hair with the extensions for a cohesive look.
- Pay extra attention to the crown and sides to ensure a seamless finish.
Now, style your hair however you like—whether it’s curls, waves, a sleek ponytail, or a half-updo. The possibilities are endless!
With these steps, you’ll achieve gorgeous, natural-looking results every time.
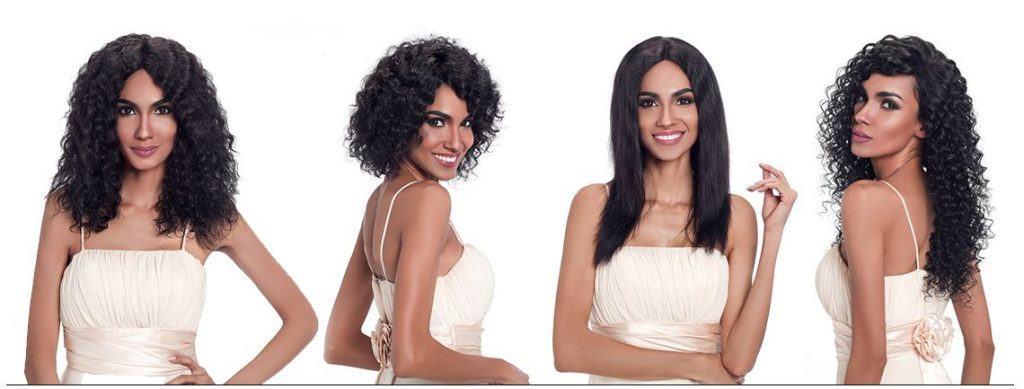
Styling Ideas with Clip-In Hair Extensions

Once your clip-in extensions are in place, try these popular styles to elevate your look:
Beachy Waves
Achieve soft, effortless curls with a curling wand. Take small sections of your hair along with the extensions, wrap them around the wand, and hold for a few seconds before releasing.
When you’re done, gently run your fingers through the curls to loosen them for a natural, beach-inspired look. Finish with a light-hold hairspray to keep your waves intact all day while maintaining a soft, natural movement.
Sleek and Straight
For a polished, professional style, straighten both your natural hair and extensions together using a flat iron. Work in small, even sections to ensure a seamless blend and ultra-smooth finish.
Before styling, apply a heat protectant to prevent damage, and finish with a lightweight serum to add shine and keep your hair looking sleek and flawless.
Voluminous High Ponytail
Create a glamorous high ponytail with added volume by layering a few smaller wefts in an upward direction for extra thickness.
Gather your natural hair and extensions into a high ponytail and secure it with a strong hair tie. For a polished touch, wrap a small section of hair around the base to conceal the tie and secure it with a pin.
Half-Up, Half-Down
For a playful and versatile look, clip your extensions into the lower section of your hair to add volume and length.
Take the top section of your hair and style it into a twist, braid, or bun, leaving the rest of your hair to cascade down. This chic, easy-to-style option works beautifully for any occasion, from casual outings to formal events.
How to Properly Remove Clip-In Extensions
To protect both your natural hair and the longevity of your extensions, it’s essential to remove them with care at the end of the day.
Start by gently unclipping each weft from the roots, working systematically from the top of your head downward. Handle each piece delicately to avoid tugging or pulling, which can cause unnecessary damage to your hair.
After removing the extensions, detangle and brush each weft to keep them smooth and tangle-free. For optimal storage, place the extensions in a silk or satin bag to maintain their softness and protect them from tangling, ensuring they’re ready for reuse.
Common Mistakes to Avoid
When using clip-in extensions, it’s easy to make mistakes that can affect how they look or feel. Here are some common ones to watch out for:
Applying to Wet or Oily Hair
Clip-ins won’t grip well on wet or oily hair and may slide out throughout the day. Always make sure your hair is clean and thoroughly dry before applying them to ensure a secure hold.
Placing Wefts Too High
Placing clip-ins too high on your head can make them visible and hard to cover with your natural hair, which can affect the seamless look you’re going for. Be mindful of placement and aim to layer them within the lower sections of your hair for better coverage.
Not Matching Texture
If your natural hair is curly but your clip-ins are straight (or vice versa), blending will be difficult, and the extensions may look unnatural. It’s important to choose extensions that match your natural hair texture, or style them to blend effectively for a cohesive look.
Over-Styling
Using excessive heat tools like straighteners or curling irons can damage both your natural hair and your extensions, reducing their lifespan. Always use a heat protectant and avoid over-styling to keep your extensions looking their best for as long as possible.
By avoiding these mistakes, you can achieve a flawless, natural look with your clip-ins while keeping both your hair and the extensions in great condition!
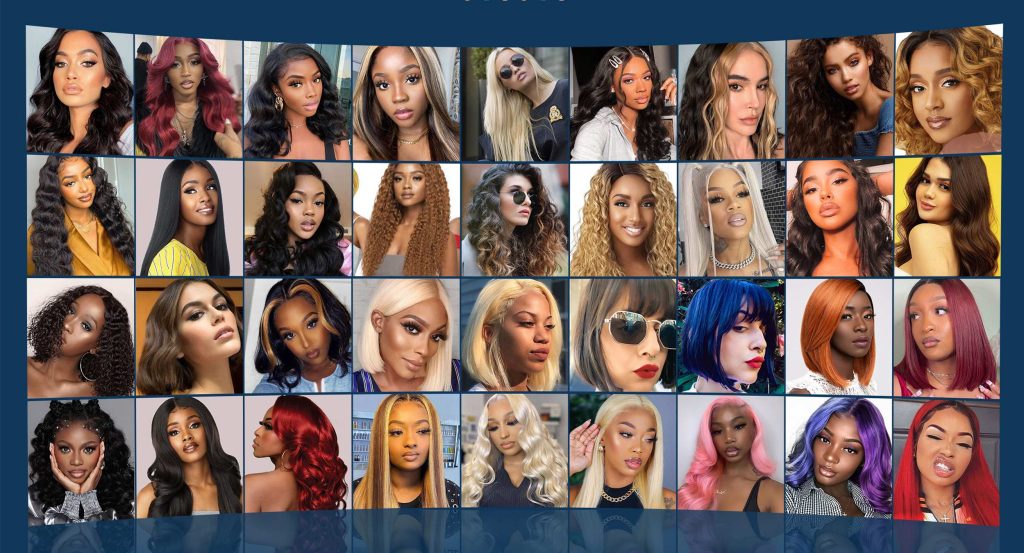
Best Clip-In Hair Extension Brands in 2025

There are so many brands of clip-in hair extensions on the market, it can be overwhelming to choose which one is right for you. To make your life easier, we have compiled a list of the best clip-in hair extension brands that will give you beautiful, natural-looking locks in 2025.
Joice Hair
Renowned for its 100% human hair clip-ins, Joice Hair offers an impressive variety of shades and textures to suit every style. Perfect for both beginners and professionals, these extensions deliver quality and versatility.
Luxy Hair
Luxy Hair makes styling effortless with its user-friendly clip-in kits. Ideal for everyday wear, their extensions come with easy-to-follow tutorials, making them a favorite for first-timers.
Bellami
For a premium, salon-quality experience, Bellami stands out. Their clip-ins feature an extensive range of lengths and thicknesses, perfect for achieving a flawless, voluminous look.
FAQs
How do I apply the clip-in extensions to my own hair for a natural look?
Start by sectioning your own hair with a rat tail comb and secure the top layers with a large clip. Use a handheld mirror or stand in front of a mirror to check placement. This helps the extensions blend seamlessly into your style.
Can I wash clip-in extensions the same way as real hair?
Yes, clip-ins made from real hair can be washed the same way as your natural hair. Use sulfate-free shampoo and cold water, then let them air dry to maintain quality and shine. Avoid heavy products to preserve the texture.
How can I make sure the extensions match my straight hair and hair color?
Choose extensions that match your straight hair texture and exact hair color—aim to match the ends, not roots. Selecting the right color is key to ensuring the extensions blend seamlessly with your style. Some stylist services offer color-matching help.
What are some tips if I don’t have enough hair on the crown area?
If you don’t have enough hair at the crown area, gently tease the roots before clipping in for better grip. Separate your hair carefully and use a large clip to hold it in place. Don’t worry—with the right tips, you’ll get a seamless look.
Conclusion
Clip-in hair extensions are more than just a beauty accessory—they’re a fast, easy way to boost confidence and switch up your style. Whether for a special event or your everyday look, clip-ins offer flexibility without the damage or commitment of permanent extensions.
Follow a step-by-step guide, choose the right texture, length, and weight, and avoid common mistakes to get flawless, salon-worthy results in minutes. With top brands like Joice Hair, Luxy Hair, and Bellami, you’ll find high-quality options that blend seamlessly with your natural hair.
The best part? Clip-in extensions let you express your personal style anytime, anywhere. Clip them in and let your hair do the talking!