Clip-in hair extensions are a quick and easy way to transform your look—whether you’re adding length, volume, or a touch of glam. But if you’re new to using them, applying them incorrectly can lead to uneven blending or visible clips. The good news? With just a few simple techniques, you can achieve a flawless, natural-looking result in minutes.
From choosing the right texture to proper placement and styling, these beginner-friendly tips will help you master the art of clip-in hair extension application.
Get ready to boost your confidence and elevate your hair game—no salon visit or professional experience required.
What is Clip-In Hair Extension
Clip-in hair extensions are temporary hairpieces designed to add length, volume, or color to your natural hair quickly and without damage. They consist of wefts of hair with small clips sewn onto the top, allowing you to easily attach and remove them at home without professional help.
Ideal for beginners, clip-ins provide a non-permanent solution for enhancing your hairstyle for special occasions or everyday glam. They come in various textures, lengths, and colors to match different hair types and styles. Because they don’t require glue, tape, or heat, clip-in extensions cause minimal damage to your natural hair.
You can style them just like your own hair—curl, straighten, or dye—as long as they’re made of 100% human hair. Clip-in extensions are an affordable and flexible way to transform your look instantly and safely.
Is It Safe to Wear Clip-In Extensions Daily Without Damaging My Natural Hair?

Yes, it is generally safe to wear clip-in extensions daily as long as you apply and remove them properly. Clip-ins are one of the least damaging extension types because they don’t involve glue, heat, or adhesives. However, daily use requires mindful care to avoid stress on your natural hair.
Always remove clip-ins before sleeping, avoid placing clips in the exact same spots every day, and gently detangle both your hair and the extensions after use. Also, give your scalp occasional rest days to breathe and recover. When used correctly, clip-in extensions can enhance your look without harming your natural hair, making them a safe and convenient choice for everyday styling and effortless beauty.
Varieties of Clip-In Hair Extensions

Clip-in hair extensions are a popular and convenient way to add instant length, volume, and style to your natural hair without long-term commitment or damage. Available in various types and textures, clip-ins cater to different hair needs and styling preferences. Understanding the varieties can help you choose the perfect set for your look.
1. Weft Clip-Ins
The most common and widely used variety, weft clip-ins consist of hair sewn onto a horizontal strip called a weft, with small clips attached. These wefts come in different widths and lengths, allowing you to customize the amount of hair added. Weft clip-ins provide full-head coverage and are ideal for adding volume and length. They are easy to apply and remove, making them perfect for beginners.
2. Single Clip Pieces
Also called individual clip-ins or single wefts, these come with just one clip and are typically smaller. They’re perfect for adding volume to specific areas, filling in gaps, or blending layers. Because they’re smaller, single clip pieces allow for more precise placement and natural layering, helping create a seamless look.
3. Double Weft Clip-Ins
Double weft clip-ins have two wefts sewn together with clips, providing extra thickness without increasing bulk. They are excellent for those who want fuller hair but prefer fewer clips for comfort. Double wefts help distribute the weight more evenly and reduce pressure on the scalp.
4. Seamless or Silicone Clip-Ins
Designed with a thin silicone base instead of traditional fabric, seamless clip-ins lie flatter against the scalp and feel lighter. This variety is less visible under fine or thin hair, making them ideal for those looking for a more discreet extension. They also reduce slipping and provide a natural finish.
5. Invisible Wire Clip-Ins
These extensions combine clips with a nearly invisible wire that wraps around the head, offering extra hold and stability. Invisible wire clip-ins are great for hairstyles requiring a strong grip, such as updos or active days.
6. U-Part Clip-Ins
U-part clip-ins are designed as a half wig with an open U-shaped part at the top. This allows you to leave out some of your natural hair at the crown, creating a seamless blend. They’re easy to install and remove, offering a natural finish with minimal effort.
7. Volumizer Pieces
Volumizer clip-ins are thicker, larger wefts used specifically to add volume rather than length. They’re great for women with fine or thinning hair who want to boost fullness without drastically changing length.
Clip-in hair extensions come in a variety of forms to suit different hair types, needs, and styles. From full wefts for maximum impact to smaller, precise pieces for subtle volume, choosing the right variety ensures a natural, comfortable, and beautiful look every time.
10 Beginner Tips for Flawless Clip-In Hair Extension Application

Clip-in hair extensions are one of the easiest and most beginner-friendly ways to add instant length, volume, and style to your natural hair. Whether you’re getting ready for a special event or simply want to elevate your everyday look, clip-ins can help you achieve salon-worthy results in minutes—no glue, no heat, no damage.
But to get that flawless, natural finish, technique matters. Here are 10 essential tips for beginners looking to master clip-in hair extension application like a pro.
1. Start with Clean, Dry Hair
Before applying your clip-ins, make sure your natural hair is clean, dry, and fully detangled. Oily or damp hair can make clips slip, while tangled hair can lead to an uneven finish. Washing your hair and letting it dry fully gives the extensions a better grip and helps them stay secure throughout the day. For added hold, avoid applying heavy oils or silicone-based products before installation.
2. Choose the Right Clip-In Extensions for Your Hair Type
Not all clip-in extensions are created equal. For the most natural look, choose a texture and color that closely matches your own. If you have relaxed or flat-ironed natural hair, Light Yaki clip-ins are a great match because they mimic the soft, slightly coarse texture of straightened Afro-textured hair.
If your hair is naturally curly or wavy, look for extensions in deep wave, kinky curly, or body wave styles. Also, make sure the length and thickness complement your hair to avoid an obvious mismatch.
3. Use a Rat Tail Comb to Create Clean Sections
One of the most important steps in applying clip-ins is sectioning your hair properly. Use a rat tail comb to create neat, horizontal parts starting at the nape of your neck. Clean sections ensure that each weft sits flat against your scalp and is covered by your natural hair. Messy parting can lead to bumps, visible clips, or uneven distribution, so take your time and work layer by layer.
4. Backcomb Your Roots for a Secure Grip
If you have fine or slippery hair, teasing the roots can help your clip-ins stay put all day. Lightly backcomb the sectioned area at the root where you’ll attach the clip, and then apply a small spritz of hairspray. This gives the clip something to hold onto, especially in areas where the hair might be too silky for a firm grip. This simple trick reduces slippage and makes the extensions feel more secure.
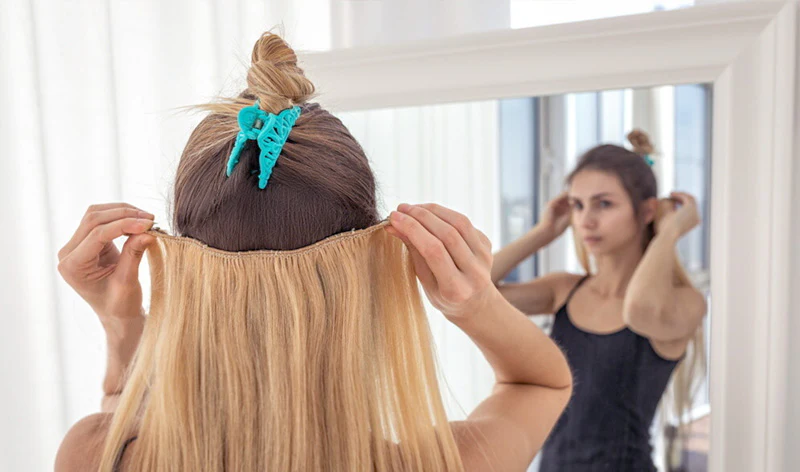
5. Start from the Bottom and Work Your Way Up
Begin by clipping the shortest weft at the nape of your neck and work your way up toward the crown. This layering method helps create a natural fall and ensures the longer wefts have the support of the shorter ones beneath them. It also balances the weight of the extensions so they feel more comfortable and less bulky as you go.
6. Blend Extensions with Your Natural Hair
Blending is everything when it comes to a flawless finish. After clipping in your extensions, gently brush your natural hair and the extensions together using a soft paddle brush or wide-tooth comb. You can also use a flat iron or curling wand to style both your hair and the clip-ins together for a seamless look. Always use a heat protectant spray to avoid damaging both your real hair and the extensions.
7. Don’t Place Clips Too Close to the Hairline
To avoid the dreaded “visible weft” look, don’t place clip-ins too close to your hairline or parting. Leave at least an inch of your natural hair around the perimeter of your head to cover the wefts. This gives you a more natural appearance and ensures your extensions are hidden from all angles—even in windy weather or under close inspection.
8. Use Edge Control and Baby Hairs for a Natural Finish
Styling your edges can take your clip-in installation from obvious to undetectable. Use a small brush or edge tool and a bit of edge control gel to lay your baby hairs around the forehead and sides. This softens the transition between your real hair and the clip-ins, especially if you’re wearing a pulled-back or half-up style. It’s a small detail that makes a big difference in achieving that polished, natural glam.
9. Style After Clipping In, Not Before
While it may seem easier to curl or straighten your extensions before applying them, styling them after they’re clipped in actually creates a better blend. Curling or flat-ironing your hair and extensions together helps them move as one unit and minimizes any visible lines between your real hair and the wefts. Whether you’re going for waves, curls, or a sleek ponytail, do your final styling after all the clip-ins are securely in place.
10. Remove Gently and Store Properly
At the end of the day, always remove your clip-ins before sleeping. Sleeping in clip-ins can cause breakage and scalp tension. To remove them, start from the top layer and gently unclip each weft—never tug or pull. After removal, brush them out carefully and store them flat in a silk or satin bag, or on a hanger made for extensions. This prevents tangling and helps them maintain their shape and softness, extending their lifespan significantly.
Clip-in hair extensions are an easy way to change your look, boost confidence, and add instant volume and length without commitment. Follow these 10 beginner tips to avoid mistakes and keep your clip-ins looking natural, secure, and flawless all day. Whether for a special event or everyday glam, mastering clip-ins is a beauty skill worth having—and now you’re ready to rock it.
How Can I Prevent Clip-Ins From Slipping Or Falling Out During The Day?

To prevent clip-in hair extensions from slipping or falling out during the day, start by ensuring your natural hair is clean and dry. Oily or damp hair reduces the grip of the clips, making them more prone to sliding. Before clipping in, section your hair neatly using a rat-tail comb to create clean, horizontal parts. For finer or silky hair textures, lightly backcomb or tease the roots where you’ll attach the clips—this provides extra hold.
Next, always snap the clips firmly shut when attaching the wefts, making sure they grip close to your scalp without pinching or discomfort. Distribute the wefts evenly around your head for balanced weight and better security.
Avoid placing clips too close to your hairline or the edges where hair is thinner, as this can make them more visible and prone to slipping. Using a bit of texturizing spray or dry shampoo on your roots before application can also improve grip.
Finally, consider using small clear elastic bands or bobby pins to reinforce the clips in tricky areas. If you follow these steps, your clip-in extensions will stay secure and comfortable throughout your day.
Tips to Maintain Your Clip-In Extensions

Proper care is essential to keep your clip-in extensions looking great and lasting as long as possible. Follow these tips to maintain their quality and appearance:
- Brush regularly: Treat your clip-ins like your natural hair by brushing them often to prevent tangles and keep them smooth. Use a soft-bristled brush or a wide-tooth comb, starting at the ends and gently working your way up to avoid tugging on the clips.
- Wash with care: When it’s time to wash your extensions, stick to a gentle shampoo and conditioner, avoiding contact with the clips themselves. After rinsing, pat them dry with a towel, gently detangle with a brush, and allow them to air dry completely before styling.
- Store properly: When not in use, store your clip-ins carefully to prevent damage. You can hang them up or lay them flat in a storage container, ensuring each weft has enough space to remain flat and secure.
- Limit heat styling: While some clip-in extensions are heat-friendly, it’s best to minimize the use of hot tools. Excessive heat can dry out the hair, leading to frizz, breakage, and a shorter lifespan for your extensions.
- Trim as needed: Like natural hair, clip-ins can develop split ends over time. To keep them looking their best, trim the ends every few months to reduce fraying and tangling.
With these simple steps, your clip-in extensions will stay beautiful and ready to enhance your look for many occasions to come.
How Often Should I Wash My Clip-In Extensions?
You should wash your clip-in hair extensions every 15 to 20 wears, or roughly every 1 to 2 weeks if worn regularly. Washing too often can strip the hair of its natural oils, causing dryness and reducing the lifespan of your extensions. On the other hand, waiting too long to wash can lead to product buildup, tangling, and an unclean feel.
When washing, use a gentle, sulfate-free shampoo and a moisturizing conditioner to maintain softness and shine. Always detangle the hair gently before washing to prevent shedding and matting. After washing, air-dry your extensions whenever possible, as excessive heat can damage the hair fibers.
If you use heat styling tools or apply many products, you may need to wash your clip-ins more frequently to remove buildup. Conversely, if you wear them occasionally or use minimal product, you can wash them less often.
Ultimately, paying attention to how your clip-in extensions feel and look will help you decide the best washing routine to keep them fresh, healthy, and long-lasting.
FAQs
Do clip-in extensions work for both your natural hair and synthetic hair?
Yes! While clip-in extensions are available in both real human hair and synthetic extensions, human hair extensions provide a more natural blend and last longer with everyday wear. They’re ideal for matching both your natural hair and natural hair color for that flawless finish.
How do I choose the right extensions for fine, medium, or thick hair?
Choosing the right extensions depends on your hair type. Fine hair may require fewer wefts to avoid visible clips and ensure extensions blend seamlessly. Medium density hair and thick hair can handle extra volume, but using too many extensions can weigh down natural strands. Always match extensions to your natural hair texture for a seamless blend.
What’s the best way to prep and apply clip-ins?
Start with freshly washed hair and use an extension hanger to organize. During the application process, part clean sections and secure the extensions securely. Brush gently before using heat tools like a curling iron or blow dryer, and avoid excessive heat styling to prevent damage. This makes all the difference in your beauty routine.
Can I use clip-ins with curly or short hair?
Yes! Curly extensions work beautifully with natural curls or short hair, helping you instantly add length and volume. For a tangle free, voluminous curls look, use high quality extensions and let them blend naturally into your styling process.
Conclusion
Mastering the art of clip-in hair extension application doesn’t have to be intimidating. With the right preparation, tools, and a little practice, you can achieve a flawless, natural-looking style in minutes. From choosing the right texture and color to sectioning your hair properly and blending like a pro, these beginner tips will help you feel confident and look amazing every time.
Clip-ins are a non-damaging, versatile option that lets you switch up your look without commitment. Whether you’re going for length, volume, or a glam finish, following these simple steps ensures your extensions stay secure, blend seamlessly, and elevate your hairstyle with ease.